This article is the operator's manual for the Malibu Gen2 campervan (JUCY / Star RV). It covers starting the vehicle, the 12-volt electrical system, fresh and grey water, the portable butane gas stove, fridge, portable toilet cassette, converting the dining area into a bed, refuelling, changing a tyre, driver controls (seats, mirrors, lights, wipers, A/C, cruise control, Bluetooth pairing), and dashboard warning lights.
Need-to-know
- Fuel type: Diesel only. If filled with petrol, water, or AdBlue - do not start the engine. Call JUCY Roadside Assistance.
- Daily drive time: 4–6 hours per day to keep the domestic 12-volt battery charged (powers fridge, water pump, rear interior light).
- Gas stove: Portable butane cooker. Indoor use only on the kitchen stove. Maximum 15 minutes continuous use. Remove cartridge when not in use.
- Toilet: Portable cassette toilet. Must be emptied and cleaned before returning the vehicle to the depot.
- Tyre size: 195R15C, 45–50 PSI.
- Oil / coolant: 5W30 engine oil. Red coolant (any brand).
- Emergency contact: JUCY Roadside Assistance - call for wrong fuel, overheating, oil pressure warning, brake/ABS warnings together, or any red dash light.
- Red dash light rule: Red = stop safely and call Roadside Assistance. Amber = drive cautiously and report.
1. Description of keys
Ignition key: Use the ignition key to start your vehicle.
2. Vehicle equipment
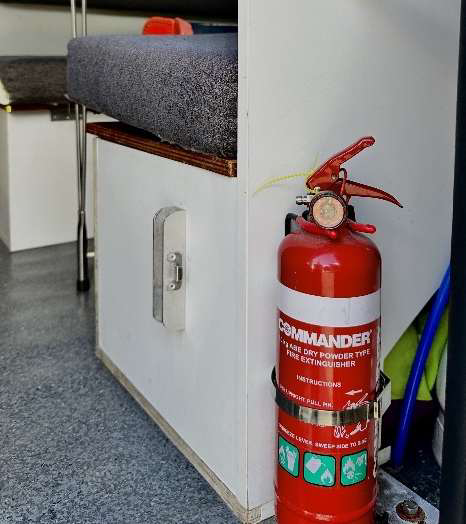 Fire extinguisher
Each vehicle is equipped with a dry chemical fire extinguisher, selected to address both Type B fires (grease and liquids) and Type C fires (electrical).
To deploy the extinguisher:
- Grasp the ring at the top of the bottle.
- Direct the nozzle towards the top of the flames.
- Press the lever down firmly.
- Guide the nozzle from side to side across the base of the flames.
The fire extinguisher is attached to the interior of the vehicle.
SAFETY: Do not attempt to put out a fire if you are in any danger. If you are unable to control the fire, stay away from the vehicle in case of explosion.
3. Starting the vehicle
The gear stick must be in PARK and your foot on the brake pedal in order for the vehicle to start.
Gear stick in parking mode
- The dashboard will display a 'P' indicating that the vehicle is in park.
- Start the vehicle using the ignition key.
- With your foot still on the brake pedal, pull the gear stick down into the 'D' position. The dashboard will display a 'D' indicating drive.
Gear stick in driving mode
Handbrake: Located next to the driver's seat.
- To disengage: Press the button and push down.
- To engage: Press the button and pull upwards.
Handbreak engaged Handbrake disengaged
4. Blinds
The vehicle is equipped with privacy curtains for the rear window, side windows, and between the front cab and the back cab.
- The blind dividing the front and back cab can be rolled up when not in use.
- The side and rear window blinds attach magnetically.
- When not needed, store the side and rear blinds in the driver's side storage unit under the table.
5. 12-volt electrical system
Your vehicle has two batteries:
- Engine battery - located under the bonnet.
- Domestic battery - located in the rear of the cabin.
The domestic battery operates the water pump, fridge, and rear interior light. It is charged by the alternator when the vehicle is being driven.
You can check the voltage of the 12-volt battery using the voltage reader on the rear passenger side of the dining area. There is also an outlet for two USB connections.
Important: It is recommended that the vehicle is driven for 4–6 hours a day so the domestic battery continues to power the 12-volt system.
There is a vent on the back of the kitchen cassette designed to keep the domestic battery cool. When your bed is set up at night, this vent will be visible in the storage compartment underneath. To prevent overheating, do not store anything against the vent at night.
6. Lights
There is a light located next to the sink in the kitchen area.
- To turn on: Push in the clear casing surrounding the bulb.
- To turn off: Press the casing again.
7. Fresh water tank
The freshwater tank is on the passenger side of the kitchen cassette. The filling hose is stored in the compartment next to the kitchen cassette.
To fill the freshwater tank:
- Open the tank: Turn the black plug counterclockwise to remove it.
- Attach the hose: Insert one end of the water hose into the tank and connect the other end to an external tap. Begin filling with fresh water.
- Close the tank: Once filled, reinsert the black plug and turn it clockwise to tighten. Make sure it is secure to prevent leaks, but avoid overtightening so it doesn't get stuck.
Important tips:
- Do not use too much pressure - the tank must be vented while filling.
- If you get an air bubble, remove the hose, reinsert it, and fill slowly again.
- The tank is full when water starts to overflow from the water inlet.
8. Tap and sink
To access fresh water, use the sink located in the kitchen cassette. To turn the tap on, hold down the right-hand switch until you have used the desired amount of water.
9. Grey water
Water that goes down your sink collects in the grey water tank, located on the driver's side of the kitchen cassette.
To empty the grey water tank:
- Locate the hose: The brown drain hose is stored in a bag in the compartment on the side of the kitchen cassette.
- Prepare for draining: Remove the lid and attach the hose to the protruding drain valve.
- Position the hose: Place the outlet over a suitable disposal point.
- Drain the tank: Pull the T-handle attached to the outlet valve upwards to start draining.
- Finish up: When the water flow stops, shut the valve, remove the hose, rinse it, and store it back in the bag.
10. Portable gas stove
The vehicle is equipped with a portable butane gas stove, found in the kitchen compartments inside a black carry case.
- Inside the vehicle, the cooker is to be used only on the kitchen stove.
- It can be used outside on a side table.
- The cooker is designed for very short periods - no longer than 15 minutes at a time.
To start the stove:
| |
2. Open the cartridge cover. | |
3. Turn the ignition knob to OFF and set the cartridge lock lever to UNLOAD. | |
4. Slide the gas cartridge into the compartment, top end first, with its notch facing up. 5. Align the cartridge collar notch with the locator tab on the gas cooker. 6. Push and turn the knob anticlockwise past the OFF position until a click is heard. | |
Note: If the burner fails to light, immediately turn the ignition knob to the OFF position and try again.
Controlling the flame: Turn the ignition knob between HIGH and LOW.
To shut off:
- Turn the ignition knob to OFF to cut the fuel supply.
- Wait until the flame is fully extinguished.
- Raise the cartridge lever to UNLOAD.
- Remove the gas cartridge from the compartment.
Do not leave the gas bottle inside the cooker when not in use.
11. Fridge
The refrigerator runs on the 12-volt system.
- To activate: Flip the middle switch on the switch panel.
- The silver dial labelled "vent" should be pushed to the right while the fridge is in use, so the door closes properly.
- Push the dial to the left (exposing the word "vent") only when the fridge is not in use and doesn't need cooling - this allows it to air out.
Important: It is recommended that the vehicle is driven for 4–6 hours a day so the domestic battery continues to power the 12-volt system.
12. Interior table
The interior table setup includes two benches that double as storage units, and a collapsible table. At night, the table can be converted into a bed (see Section 14).
13. Portable toilet cassette
It is highly recommended to regularly empty the toilet cassette. It is mandatory to empty and clean it before returning the vehicle to the depot.
To set up the toilet:
- Open the side latches to separate the toilet into two parts.
- Add toilet chemical plus 1–2 L of water to the waste tank (bottom half).
- Fill the top tank with clean water for flushing.
- Reattach the top and bottom, then clip the latches shut.
To use the toilet:
- Open the slide valve (below the seat) before use.
- Flush by pressing the pump button a few times.
- Always close the slide valve after flushing to keep odours in.
To empty the toilet:
- Empty when the waste tank is around three-quarters full.
- Make sure the slide valve is closed.
- Unclip and remove the top tank.
- Carry the waste tank to a dump point (campground or RV station).
- Unscrew the cap and pour waste slowly.
- Rinse with clean water, shake, and empty again.
To refill the toilet:
- Add fresh water and toilet chemical back into the waste tank.
- Reassemble the toilet and refill the flush tank with clean water.
- Make sure all caps and latches are tightly secured.
14. Bed
To set up the bed:
- Remove the seat squabs from the seat base and remove the bed extension.
- Remove the loose plywood from the left and right-hand side.
- Open the hinged seat base to the vertical position against the tabletop.
- Lift the middle table up and tuck the left and right seat base underneath. Press down on the middle table to check it is secured.
- Place the left and right loose plywood (with cut-outs) between the seat-back alloy strip and on top of the vertical section, matching the corresponding cut-outs to hold the panel in place.
- Check the plywood is flat and secured. Put weight on the left and right sides so it sits firm.
1. | 2. | 3. |
4. | 5. | 6. |
- The bed base is now secured. Make sure the sink is covered and wiped down before placing squabs on top.
- Place the bed extension table on a flat surface to open the table legs. Note: the bed extension is for inside use only - not to be used as an outdoor table.
- Lift the right side leg up until you hear it click and lock in place.
- Lift the left side leg up until you hear it click and lock in place.
- Once both table legs have been clicked in and secure, flip the table over on to its legs.
- Bed extension table is now ready to be connect to the bed.
- Slide the extension bed in with the metal side (hole facing the middle table). Lift the middle table and tuck the metal part of the extension bed underneath.
- Slide the bottom legs to connect into the aluminium channel. Pull the steel clip to connect to the steel hook.
- Push the steel tab to lock the lower left and right extension legs in.
7. | 8. | 9. |
10. | 11. | 12. |
13. | 14. | 15. |
- Lower left & right leg should now be fully locked in as per photo.
- Put weight on the bed extension to make sure it is fully secured.
- Bed base is ready for bed squabs to be placed on top
- Place the large rear bed base squab on the kitchen bench.
- Rear bed base squab placed firmly on the kitchen bench & now place the rest of the bed squabs on to the bed.
- Place the remaining bed squabs on to the bed, ensure the squab with no Velcro tabs is placed in the middle
- Place the middle bed squab on top of the middle table, with the four Velcro tabs flat and firm.
- Place the smaller extension bed squab on the extension table and secure it firmly against the left and right squabs.
- Once all bed squabs are firmly placed and secured, the bed is ready.
16. | 17. | 18. |
19. | 20. | 21. |
22. | 23. | 24. |
15. Diesel fuel
The vehicle accepts DIESEL only. Do not refill with any other fuel or fluid.
- The fuel tank cap is marked with "Fill me up with Diesel".
- The fuel flap can be opened from the driver's seat by pulling the fuel lever.
- The fuel filling location is on the passenger side of the vehicle.
- Once filled, place the fuel cap on the inlet and turn it to lock.
Important: If you accidentally fill the vehicle with petrol, water, or AdBlue - do not start the engine. Call JUCY Roadside Assistance immediately.
16. Changing a tyre
Prepare the vehicle:
- Stop the vehicle in a safe, flat, and stable area.
- Turn off the engine and engage the parking brake.
Retrieve the tools (tool bag under the passenger seat):
- Rod for spanner
- Bolt spanner
- Jack
Change the tyre:
- Loosen the wheel bolts by one turn using the bolt spanner, extension, and rod.
- Extend the jack slightly and position it at the designated lifting point.
- Raise the vehicle with the jack until the wheel is off the ground.
- Remove the spare wheel from under the vehicle and free it from its holder.
- Place the spare wheel, lining up the holes with the pins.
- Tighten the bolts using the bolt spanner, extension, and rod - cross from one bolt to the opposite one.
- Lower the vehicle and remove the jack.
Don't forget to:
- Tighten the wheel bolts fully.
- Put the punctured wheel back in its holder and tighten the knob.
- Store the tools back in their bag and place under the passenger seat.
17. Safety and operational features
Seat adjustment
- Longitudinal adjustment: Lift lever (1) to slide the seat forward or backward. Arms should rest comfortably on the steering wheel when seated.
- Backrest angle: Lift lever (2) to adjust the backrest angle.
- Height - raise: Lift lever (3) upwards and slightly lift your body.
- Height - lower: Push lever (3) downwards and shift your weight to lower the seat.
- Lumbar support: Press switch (4) left or right to customise lumbar support.
Exterior mirror adjustment
The exterior mirrors can be adjusted when the engine switch is in ACC or ON.
- To select a mirror, turn the switch: A = Left mirror, B = Right mirror.
2. To adjust the selected mirror, operate the switch: A = Up, B = Right, C = Down, D = Left.
External lights
The auto function for headlights automatically adjusts the vehicle's lights based on surrounding light conditions. It activates headlights at dusk, in tunnels, or in low visibility.
To turn on: Rotate the ring of the right stalk to the AUTO position.
Windscreen wipers and washer
The left stalk controls the windscreen wiper and washer. Settings available:
- Off
- Intermittent operation
- Low-speed operation
- High-speed operation
- Temporary (single-swipe) operation
|
|
Air conditioning system
Controls:
- A: Airflow mode control knob
- B: Fan speed control knob
- C: Temperature control knob
- D: "A/C" switch
- E: Outside / recirculated air mode switch
- F: Rear window defogger and exterior rear-view mirror defogger switch
Adjusting temperature: Turn knob (C) clockwise for warm, counterclockwise for cool. If "A/C" (D) is not pressed, the system will blow ambient or heated air.
Adjusting fan speed: Turn knob (B) clockwise to increase, counterclockwise to decrease. Turn to the far left to switch the fan off.
Changing airflow mode: Turn knob (A) to the desired position.
Outside vs. recirculated air: Press switch (E) to toggle. When recirculated air is selected, the indicator on (E) illuminates.
Cooling and dehumidification: Press the "A/C" switch (D). When on, the indicator illuminates.
Defogging the windshield:
- Turn the airflow mode knob (A) to the windshield defogger position.
- Set switch (E) to outside-air mode (it may switch automatically).
- To defog quickly, turn the airflow and temperature up.
- If the dehumidification function is not running, press the "A/C" switch.
Display screen
- A: Tachometer
- B: Outside temperature
- C: Clock
- D: Multi-information display
- E: Speedometer
- F: Fuel gauge
- G: Odometer, trip meter, and instrument cluster light control
- H: Shift position and shift range
- I: Engine coolant temperature gauge
- J: Odometer / trip meter switch
Display control buttons:
A: Select menu icons
B: Change displayed content, scroll up/down, or move the cursor
- C: Return to the previous screen
- D: Answer / end call via Bluetooth
Electronic cruise control
Cruise control maintains a set vehicle speed without pressing the accelerator. Buttons are located on the right side of the steering wheel.
Activate: Press button B. The symbol will appear on the instrument panel.
Set the desired speed:
- Activate the system.
- Once the vehicle reaches the desired speed, press and release SET + or SET –. The vehicle will automatically maintain that speed once the accelerator is released.
- You can temporarily accelerate by pressing the accelerator. When released, the vehicle returns to the stored speed.
Warning: Ensure the vehicle is at a constant speed on a flat surface before pressing SET + or SET –.
Adjust speed:
- Increase: Press and hold SET +. Release to store the new speed.
- Decrease: Press and hold SET –. Release to store the new speed.
Deactivate: Press the CANC button or press the brake pedal. The system will also deactivate if the electric parking brake (EPB) is engaged or if the braking system is triggered.
Pairing a Bluetooth device
- Activate Bluetooth on your phone - go to settings, turn on Bluetooth, and set it to "discoverable" or "searchable".
- On the HiAce audio system, locate the "Setup" or "Menu" button, then navigate to Bluetooth (may be under "Connections" or similar).
- In the Bluetooth menu, select "Add new device" or "Pair a phone".
- When your phone appears in the list, select it.
- Make sure the pairing codes match on both screens and confirm on both.
- Once paired, you can stream audio and use hands-free calling.
Additional information
- Tyre size: 195R15C
- Tyre pressure: 45–50 PSI
- Oil type: 5W30
- Coolant type: Red coolant (any brand)
18. Dash warning lights
| Warning Light Symbol | Warning light | Description | What to do |
|---|---|---|---|
| Brake warning (Red) | Handbrake engaged or low brake fluid. If shown with ABS light, brake fault. | Pull over safely and avoid sudden braking. If shown with the ABS light, stop immediately and contact Roadside Assistance. | |
| ABS warning (Amber) | ABS fault - brakes still work without ABS. If shown with brake light, possible brake failure. | If on alone, drive cautiously and check as soon as possible. If shown with brake light, stop immediately and call Roadside Assistance. | |
| Electronic Stability Control (Amber) | Traction control fault. Flashing = active; constant = fault. | Drive with caution. Restart the engine; if it stays on, contact Roadside Assistance. | |
| Power steering (Amber/Red) | Overheated or failed steering assist. | If red, take extra care steering. Pull over and contact Roadside Assistance. | |
| Airbag / SRS (Red) | Fault in airbag or seatbelt system. | Contact Roadside Assistance. | |
| Coolant overheat (Red) | Engine overheating - possible low coolant or leak. | Stop immediately and contact Roadside Assistance. | |
| Battery charge (Amber / Red) | Battery not charging. | Contact Roadside Assistance. | |
| Oil pressure (Red) | Low oil pressure or high oil temperature. | Stop immediately and contact Roadside Assistance. | |
| Engine management (Amber) | Fault with engine or emissions. | Continue to your destination, then contact Roadside Assistance. | |
| Immobilizer (Amber) | Anti-theft fault or key battery issue. | Continue driving and contact Roadside Assistance. | |
| Pre-collision system (Amber / Red) | Active intervention or system fault. | If red or faulty, check for obstructions and clean sensors. System disabled until fixed. | |
| Stop & Start (Amber) | System deactivated or fault. | Safe to drive. Contact Roadside Assistance if faulty. | |
| Parking assist sensor fault (Amber) | Dirty or damaged parking sensor. | Parking alerts disabled - clean sensors and report the fault. | |
| Radar sensor fault (Amber) | Rear cross-traffic alert disabled. | Clean rear sensors. Report if it persists. | |
| Lane departure alert (Amber) | System off or fault. | Check whether it's turned off; if faulty, contact Roadside Assistance. | |
| Tyre pressure (Amber) | Low tyre pressure or puncture. | Inflate to spec; if flat, stop and call Roadside Assistance. | |
| Glow plugs (Amber) | Fault with glow plugs or relay. | Safe to drive short term - contact Roadside Assistance. | |
| Diesel particulate filter (Amber) | DPF regenerating or blocked. | Continue driving for 15 minutes. If it persists, call Roadside Assistance. | |
| Collision avoidance (Amber / Red) | System active or fault. | If faulty, check sensors for obstruction. System disabled until fixed. |