This article is the operator's manual for The Big Kahuna from Chill'd by JUCY motorhome - Australia Self Contained. It covers keys, fire extinguisher and smoke alarm, starting the vehicle, windows and vents, entry door, outdoor step, seatbelts and baby seats, the 240-volt and 12-volt electrical systems, microwave, fresh water, grey water, water pump, hot water heater, toilet use and cassette, gas bottle, stove top and grill, heater and air conditioner, fridge, lights, television, media, bed conversion, storage, awning, diesel fuel, and AdBlue.
Need-to-know
- Fuel type: Diesel only. The fuel cap is marked "DIESEL" and is unlocked using the vehicle diesel key. If filled with unleaded, water, or AdBlue - do not start the engine. Call JUCY Roadside Assistance immediately.
- AdBlue: Required every 2,500 km. Low level triggers a dashboard warning. Failure to refill causes the vehicle to go into limp mode. Do NOT add AdBlue to the diesel tank.
- 240-volt: Required for microwave, power points, and air conditioner. Plug in every second night to keep the house battery charged. Plug in on the driver's side only.
- 12-volt battery: Powers TV, water pump, fridge, and interior lights. Lasts up to two days off-grid. Must stay above 12-volt for appliances to operate.
- Water pump: Must be switched on via the main switchboard for tap, shower, and toilet flush to work. Turn off when not in use. Do not run empty.
- Tap water: Not suitable for drinking.
- Gas bottle: Located in the exterior LP gas locker. Never drive with the gas bottle open. Turn off after every use.
- Hot water: Gas or 240-volt heated. Gas takes 20–25 minutes. 240-volt activates automatically when plugged in.
- Toilet cassette: Must be emptied and cleaned before returning to the depot.
- Smoke alarm: Powered by a replaceable 9V battery. Do not disconnect. Keep connected at all times.
- Fridge: Use AUTO mode at all times. Requires level ground for gas and 240-volt operation. Allow 6–12 hours to cool after being turned off.
- Air conditioner: 240-volt only. Always turn off via remote before unplugging from mains.
- Emergency contact: JUCY Roadside Assistance - call for wrong fuel, overheating, oil pressure warning, or any red dash light.
1. Description of keys
Ignition key:
- Start the vehicle.
- Lock/unlock the fuel tank cap.
Remote key: Some vehicles may have a push-to-start button. While driving, place the key in the cupholder next to the driver for the vehicle to operate.
Side entry door key: Lock/unlock the vehicle's side entry door.
External storage compartments key:
Use this key to lock or unlock vehicle's external storage compartments, including:
- The LP gas compartment on rear passenger side.
- Storage compartments accessible from the rear driver and passenger side, the small storage compartment beside the passenger cabin door.
- toilet cassette compartment.
Fresh water key: Lock/unlock the freshwater tank located on the passenger side of the vehicle.
Auxiliary shower key: Lock/unlock the outside auxiliary shower at either the rear of the vehicle or the driver's side.
2. Vehicle equipment
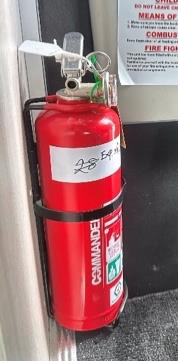
Fire extinguisher
Each vehicle is equipped with a dry chemical fire extinguisher, selected to address both Type B fires (grease and liquids) and Type C fires (electrical). The fire extinguisher is attached to the interior of the vehicle.
To deploy the extinguisher:
- Grasp the ring at the top of the bottle.
- Direct the nozzle towards the top of the flames.
- Press the lever down firmly.
- Guide the nozzle from side to side across the base of the flames.
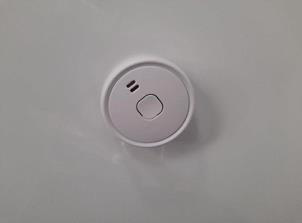 Smoke alarm
Each vehicle is furnished with a smoke alarm powered by a replaceable 9-volt battery. If a replacement is needed during your rental, purchase a new battery, retain the receipt, and reimbursement will be arranged upon vehicle return.
Do not disconnect the smoke alarm. It must be connected at all times for your safety.
3. Starting the vehicle
The gear stick must be in PARK and your foot on the brake pedal in order for the vehicle to start.
Gear stick in parking mode
- The dashboard will display a 'P' indicating that the vehicle is in park.
- Start the vehicle using the ignition key.
- With your foot still on the brake pedal, pull the gear stick down into the 'D' position. The dashboard will display a 'D' indicating drive.
Gear stick in driving mode
Handbrake: Located on the right-hand side of the steering wheel.
- To disengage: Click the handbrake down once. A white light will disappear from the dashboard.
- To engage: Pull the handbrake button towards you. A white light will appear.
Note: Do not forget to disengage the handbrake before you drive. The vehicle will signal the handbrake is still on via a loud beeping sound.
Folding handbrake (some vehicles): Some vehicles have a folding handbrake that allows you to fold it down without turning it off, so you can move around freely in the front cabin while parked.
- To engage: Push button in and lift as usual.
- To disengage: Push button in and release down as usual.
- To fold down without turning off: Ensure the handbrake is in the engaged position and push down without pressing the button.
- To disengage before driving: Pull the handbrake back to the top. Once at the top, push the button and pull the handbrake slightly up again before pushing to the floor.
4. Windows and vents
Windows:
To open the windows, turn the handles inwards. Push the window out and click the latch in place. Each window has a mosquito net and a sun blackout blind. These can be used separately.
- To use the mosquito net: Pull the white blind down using the handle indents.
- To use the sun blackout blind: Pull the blind up using the handle indents.
Vents:
- To open: Twist the handle clockwise.
- To close: Twist the handle anticlockwise.
- To use the flyscreen: Pinch the top buttons together and pull to the left.
- To use the blackout blind: Pinch the bottom buttons together and pull to the left.
Note: Some vents may vary between models.
5. Entry door
To open the door from outside: Pull the door handle outward.
To open the door from inside: Pull the door handle downwards and apply slight pressure to the door. When the door is locked, neither the inside nor outside door handle can be operated.
To lock from outside: Turn the key anticlockwise towards the lock symbol on the entry door lock.
To unlock from outside: Turn the key clockwise towards the unlock symbol on the entry door lock.
Note: Doors may vary between models.
6. Outdoor step
The motorhome is equipped with an electric side doorstep.
- To open: Press the down button. The switch is located on the right-hand kitchen wall.
- To close: Press the up button.
Note: Do not try to manually open or close the step.
7. Seatbelts and baby seats
It is the law in Australia that all passengers in a motorhome must be properly restrained with seatbelts. Vehicles are equipped with both lap and shoulder belts. Only seats fitted with seatbelts can be occupied while the vehicle is moving. Insert the belt tongue into the correct buckle until you feel it click and latch.
The two anchor points for baby seats are located on the forward-facing seat at the dinette behind the driver's cabin.
Please note: The table must be removed at all times while passengers are sitting at the dinette seats while in transit.
To install a baby seat:
- Remove both back cushions for easy access.
- Place the tether strap over the back of the seat.
- Firmly attach the tether strap to the anchor point.
- Pull the strap to tighten the seat as much as possible, then put the backrest cushion back in place.
- Thread the motorhome's seatbelt through the forward-facing seatbelt path on the baby seat from one end and buckle on the other side. After pulling the belt through and buckling it, push down on the baby seat and pull on the belt so that it locks.
- Once the baby seat is firmly secured, place the remaining part of the back cushion in its original position.
8. 240-volt electrical system
To run the microwave, power points, air conditioner, and to recharge the house battery, connect the motorhome's 15AMP electricity cord to a 240-volt external power source. These devices will only work when connected to 240-volt power. It is recommended that every second night the vehicle is charged at a powered outlet to keep batteries charged.
Important: Always plug in on the driver's side. The outlet on the passenger side is intended to plug in your own accessories once the vehicle has been plugged in from the driver's side.
To use the 240-volt electrical system:
- Connect the motorhome's 15AMP electrical cord to a 240-volt external power source at a caravan park.
Circuit breaker: The 240-volt outlets and appliances are protected by a circuit breaker. If a power surge trips the circuit breaker, locate it inside the motorhome on the main switchboard and switch back to the ON/UP position. Overloading the system (e.g. using the air conditioner and microwave at the same time) can cause circuit breakers to trip.
Troubleshooting: If experiencing difficulty charging the vehicle:
- Ensure the power point at the caravan park is in working order.
- Unplug the van from the powered outlet.
- Attach an alternative device (mobile phone, toaster, etc.) into the power lead on the van and check the lead is working.
- Plug the device directly into the powered outlet at the caravan park.
- If there is an issue with the powered outlet, inform caravan park staff.
9. 12-volt electrical system
The motorhome has three batteries: one in the engine compartment and two in the rear of the cabin (the auxiliary batteries). The engine compartment battery is located under the passenger's side cabin floor in the main driver's cabin.
The auxiliary battery operates the TV, water pump, fridge, and interior lights. It is charged by both the alternator when the vehicle is being driven and by the 240-volt system when plugged into mains power.
The 12-volt electrical panel is located above the fridge inside the motorhome, labelled "Main Switch Board". Push down the silver button to open the cupboard. The panel operates lights, fridge, water pump, water heater, toilet, rangehood, media, and ACC. The 240-volt circuit breaker, battery charge panel, fresh water and grey water gauge, hot water switch, media player, microwave plug, and fridge plug are also inside.
Important: The battery indicator must be above 12-volt for appliances to run on the house battery. The house battery can only last up to two days before it must be charged again.
12-volt Battery charging times:
- Driving: Drive at least 30–40 km to get back up to 12-volt from approximately 10-volt (if battery is in good condition).
- 240-volt power: Should charge back over 12-volt after 10–15 minutes.
Accessories: Multiple power points are located throughout the vehicle for personal devices. These will only operate when the vehicle is connected to 240-volt power. Locations vary by model but are typically on the kitchen bench, under the middle table, on the wall underneath the TV, and outside underneath the awning.
10. Microwave
The microwave operates via 240-volt power only. The vehicle must be plugged into a powered site at a caravan park or campground.
Do not put the following in the microwave:
- Paper bags (except purpose-designed microwave bags such as popcorn bags)
- Aluminium foil
- Dishes with metal rims
- Plastic containers
- Wire ties from bread and metal utensils
- Styrofoam plates and cups
- Glass jars
Safe to use in the microwave:
- Microwave-approved glass, ceramic plates, and bowls
- Microwave browning dishes
- Microwave plastic wrap, wax paper, paper towel, and napkins
- Paper plates and cups
Troubleshooting:
- Microwave has no display: 240-volt power is not plugged in. Check the vehicle is connected to mains power and the powered outlet is working.
- Microwave has power but is not heating food: Microwave may be broken. Call the JUCY on roads team for assistance.
- Sparks or arcing when microwave is turned on: A metal object is in the microwave.
11. Fresh water tank & water access
The vehicle has an onboard freshwater system consisting of a water pump and freshwater tank. The water tank has a 120L capacity and is located on the passenger side of the vehicle. This water is for the sink, shower, and toilet flush. Fill up as often as possible.
To fill the freshwater tank:
- Insert the blue hose from the rear storage unit into the tank as far as possible.
- Connect the attachment on the other end to an external tap.
To access fresh water from the sink:
- Turn on the water pump switch on the main switchboard panel.
- Lift the lever on the tap.
Please note: You can check the water level using the left gauge on the 12-volt switchboard. Do not drink water from the tank.
12. Grey water tank
The grey water holding tank collects wastewater from the kitchen, bathroom sink, and shower. You can check the level using the right gauge on the 12-volt switchboard. Note: the grey water level indicator may give an inaccurate reading and show 100% even when empty. We recommend emptying the grey water tank as regularly as possible.
To empty the grey water tank:
- Collect the grey water hose from the storage compartment.
- Connect the hose to the outlet. Make sure it is firmly attached by pulling down the silver levers on each side of the attachment.
- Place the other end of the hose into the dump station disposal opening.
- Open the tank by turning the red lever towards you so it is parallel with the pipe. Wait for it to empty.
- Once the grey water is empty, close the lever, remove the hose, and stow it away in the storage compartment.
If the grey water tank becomes obstructed:
- Insert a hose into the grey water outlet as far as it reaches.
- Turn on the hose to its highest pressure setting and direct the flow of water into the tank until it reaches full capacity.
- Withdraw the hose to facilitate the flow of grey water.
- Repeat if needed until the obstruction is cleared.
13. Water pump
To use water on board the vehicle, ensure there is water in the freshwater tank by checking the gauge. On the switchboard, flip the water pump switch. You will hear the pump quietly start up. The pump operates as part of the 12-volt system. When you are not using the water pump, ensure it is turned off.
The water pump must be on to operate the kitchen tap, shower, and toilet flush.
Please note: Avoid running the pump when the water tank is empty. Operating the pump continuously with no water can cause damage.
14. Hot water heater
The switch to activate the gas-operated water heater is on the main switchboard.
To operate the hot water heater:
- Turn the gas bottle (located in the rear doors under the bed) to the ON position. Twist the valve counterclockwise to open and clockwise to close. The system will not function if there is insufficient gas.
- Activate the water pump and water heater switch on the 12-volt switchboard.
- Adjust the Boiler switch upwards to the 60-degree mark.
- A brief red light will flash on the Boiler switch then extinguish, indicating the system is operating. If the red light persists (burner has not ignited), cease all operations, reset the switch to the neutral O position, and retry. You may attempt this up to three times. If ignition is not achieved by the third attempt, allow the system to rest for 10–15 minutes before retrying.
If the red light is not continuously illuminated, the system will proceed to heat water for your shower and sink. It typically takes around 20-25 minutes for the water to reach the desired temperature.
Please note: The motorhome also has a 240-volt hot water system. When connected to mains power, this will automatically activate and heat the water. If water has already been heated via 240-volt, the gas hot water operation will be inactive.
15. Toilet use
- Turn on the water pump on the 12-volt control panel.
- Push the blue button on the toilet to fill the base with water (Diagram A).
- Once finished, adjust the lever on the bottom of the toilet to empty into the cassette (Diagram B)
- Ensure the lever is in the closed position after use.
16. Toilet cassette
It is highly recommended to regularly empty the toilet cassette. It is mandatory to empty and clean it before returning the vehicle to the depot.
To empty the cassette:
- Lift the blue lever and remove the entire cassette from the vehicle.
- Rotate the pour-out spout and unscrew the cap.
- Dispose of waste at a designated black water dump point.
- Rinse the cassette thoroughly and repeat the emptying process.
- Add a toilet chemical along with half to one litre of water.
- Click the cassette back into position so it aligns with the toilet above.
If the cassette becomes jammed: Do not apply excessive force. Ensure the toilet cavity inside the vehicle is securely closed, then remove the cassette.
Please note: It is crucial for the cassette to click back into position to align with the toilet above.
17. Gas bottle
The gas bottle is located on the exterior of the vehicle in a locker marked with an LP gas storage label.
IMPORTANT: Never drive with the gas bottle turned to the open position.
- To open: Rotate the valve fully anticlockwise.
- To close: Turn the valve clockwise until securely tightened.
If you smell gas:
- Extinguish all open flames and smoking materials.
- Do not touch any electrical switches.
- Shut off the gas supply at the gas bottle valve.
- Open doors, windows, hatches, and all other ventilation openings.
- Evacuate the area until the gas odour dissipates.
- Contact JUCY for assistance.
18. Stove top and grill
Warning: Do not use cooking appliances for comfort heating. Always have sufficient ventilation when using the stove. The stove top lid must be in a fully upright position for the hotplate and grill to ignite.
How it operates
The gas burners in the vehicle operate on LPG. The basic operation is the same as a gas stove in a house. However, the amount of oxygen in a motorhome is limited due to its size; therefore, always have
sufficient ventilation when using the stove.
To use the stove top:
- Locate the gas bottle on the outside of the van and turn the valve on top fully to the open position.
- Lift the glass stove lid so it is fully upright. If the lid is partially open, the burners will not work.
- Push in, hold down, and turn the burner knob to your desired heat level.
- While the burner knob is still being pushed in, press the igniter switch until the gas lights.
- Keep holding down the burner knob.
- Wait approximately 15 seconds before slowly releasing the burner knob.
Please note: If the flame extinguishes, the burner knob may have been released too soon. Start from step 2 and try again.
To operate the grill: Select the knob marked "grill" at the far end. Operate the same way as the stove top. Make sure the stove top lid is fully open when using the grill.
If using a match: Light the match first, hold it next to the burner, then open the burner valve. To prevent too much unburned gas accumulating, do not open the valve before lighting the match.
If the stove does not ignite there may be insufficient power in the battery to provide a spark. Connect to mains power or use a match.
19. Heater and air conditioner
The vehicle is equipped with a reverse cycle air conditioner that generates both hot and cold air. The air conditioner only works when plugged into 240-volt power.
To operate the air conditioner:
- Plug the vehicle into 240-volt mains power.
- Turn on the unit by pressing the blue power button on the remote control.
- Select the mode.
- Adjust the temperature using the plus button (higher) or minus button (lower).
Important: Always turn off the air conditioner using the remote before disconnecting the vehicle from 240-volt mains power.
In humid and hot conditions:
When using the air conditioner in humid climates, it's essential to take extra precautions to ensure optimal performance and minimize potential issues.
- Keep curtains and blinds closed if leaving the vehicle unattended for an extended period.
- Before activating the air conditioner, ventilate the interior by opening doors and windows to expel warm air.
- Once the internal temperature has decreased, close all windows and external doors before switching on the air conditioner.
- Adjust the temperature to 23°C with the fan at maximum speed. Do not set the temperature below this level.
- Following these guidelines reduces the risk of condensation and water overflow.
Note: During periods of high temperature, air conditioners may experience power fluctuations due to voltage drops, which can blow internal fuses.
In cold conditions: The air conditioning unit may cease functioning when temperatures drop below 4°C. Wait for the temperature to rise before attempting to use it again.
20. Fridge
Important: Always use the fridge in AUTO mode. The fridge must be parked on level ground for gas and 240-volt operation. If outside temperature exceeds 34°C, place an ice bag at the bottom shelf to achieve optimum cooling.
The fridge operates via a three-way system (12-volt, gas, and 240-volt).
Locate the fridge switch in the main switchboard panel and keep it on for the duration of your journey. The fridge requires at least 6–12 hours to cool down if turned off.
When activated, the operation panel between the fridge and freezer will display "Auto", indicating the fridge is set to automatically switch between battery, gas, and power modes.
To manually switch fridge modes:
240-volt: To be only used when plugged into 240-volt mains power. The vehicle must be parked on level ground to operate the fridge on 240-volt mains power.
To manually select the 240-volt operation:
- Press the silver dial and turn until the second bar, labelled "Auto," is highlighted.
- Press again click to select.
- Turn the dial again until you see the 'plug' symbol highlighted with a white border and press to select.
- Turn the dial to press the back arrow and return to home screen.
Battery: The 12-volt source operates only when the vehicle is being driven. If you try to use the battery when stationary it will not work. The fridge may beep and the display screen will continuously flash.
To manually select the 12-volt operation:
- Press the silver dial and turn until the second bar, labelled "Auto," is highlighted.
- Press again click to select.
- Turn the dial again until you see the 'battery' symbol highlighted with a white border and press to select.
- Turn the dial to press the back arrow and return to home screen.
Gas: To be only used when stationary and NOT plugged into 240-volt mains power. When using gas, ensure your gas bottle is open correctly. The vehicle must be parked on level ground to operate the fridge on gas
To manually select the gas operation:
- Press the silver dial and turn until the second bar, labelled "Auto," is highlighted.
- Press again click to select.
- Turn the dial again until you see the 'battery' symbol highlighted with a white border and press to select.
- Turn the dial to press the back arrow and return to home screen.
PLEASE NOTE: It is highly recommended to use the fridge in Automatic mode. In automatic mode the fridge will automatically selects the best source available.
To set the temperature: Press the silver dial. Turn to the desired temperature level on the temperature bar - the more bars, the cooler the fridge.
To open fridge and freezer: Pull the levers on the compartment doors.
Please note: Do not overfill shelves. Excess weight can damage fridge shelves. Evenly distribute weight.
Fridge error codes:
| Error code | Possible cause | Solution |
|---|---|---|
| E03 | No connection between power module and display. | Turn fridge switch off and on. Press silver button for 3 seconds until first beep. Contact JUCY if problem persists. |
| E07 | No cooling in gas mode. Gas cylinder empty, valve closed, or air in supply line. | Replace gas cylinder or open valve slowly. Press silver button for 3 seconds. Switch off and on up to 4 times. Check vehicle is level. Contact JUCY if problem persists. |
| E08 | No cooling in 240-volt mode. Fuse defective, not connected to mains, or heating element defective. | Check circuit breaker and mains connection. Check vehicle is level. Press silver button for 3 seconds. Contact JUCY if problem persists. |
| E09 | No cooling in 12-volt mode. Battery discharged, ignition not on, or heating element defective. | Recharge 12-volt battery. Ensure vehicle is running. Press silver button for 3 seconds. Contact JUCY if problem persists. |
| E12 | Gas valve test error. Gas operation not possible. | Turn off gas valves then slowly turn on again. Press silver button for 3 seconds. Contact JUCY if problem persists. |
| E13 | Internal communication error. Gas operation not possible. | Press silver button for 3 seconds. Contact JUCY if problem persists. |
| E14 | Battery charge too low in standalone gas mode. | Recharge 12-volt battery. Turn fridge off and on. Contact JUCY if problem persists. |
| E50 | Gas lock after 3 ignition attempts. | Press silver button for 3 seconds. Or replace gas cylinder if empty. |
| E51 | Gas lock - internal error in power module. | Press silver button for 3 seconds. Contact JUCY if problem persists. |
| E52 | Ground contact - gas valve. | Press silver button for 3 seconds. Contact JUCY if problem persists. |
| E53 | Ground contact - ignition electrode. | Press silver button for 3 seconds. Contact JUCY if problem persists. |
1 12-volt Battery Charging Time
Driving: drive at least 30/40km to get back up to 12-volt from approx. 10-volt if the battery is still in good condition.
Powered site: Using 240-volt power should charge back over 12-volt after 10 to 15 minutes
IMPORTANT: If you are going off grid for a few days, ensure you have a full battery (12-volt) as your battery will only last up to two days when used conservatively.
Fridge insufficient cooling - general troubleshooting:
| Symptom | Solution |
|---|---|
| Ventilation around cooling unit not sufficient. | Check ventilation grille is not obstructed. |
| Evaporator is iced up. | Check fridge door is properly closed. Defrost the fridge. |
| Temperature set too high. | Set a lower temperature. |
| Ambient temperature too high. | Remove ventilation grille temporarily to allow warm air to escape. |
| Too much food placed in at once. | Remove an item. |
| Too much warm food placed in at once. | Remove warm food and allow to cool before placing in fridge. |
| Fridge has not been operating for very long. | Check temperature again after 4–5 hours. |
| Vehicle not parked on level ground. | Park on level ground. |
21. Lights
To use the cabin lights, turn on the light switch in the main switchboard.
Use the switches located on the right-hand wall of the kitchen and next to the TV. Location and sizes may vary depending on vehicle model.
Each light can also be operated directly by pressing the button on the device. The switches next to the side entrance door will turn on the outdoor lights underneath the awning.
Please note: Once finished using the lights, turn them off at the device and at the 12-volt panel to conserve battery power.
22. Television
Each vehicle is fitted with a smart television. The remote is located in the main switchboard cupboard. The TV operates on both 12-volt and 240-volt mains power. It features apps including Netflix, Prime Video, Kayo, and more - accessible when connected to Wi-Fi and internet.
Please note: Television reception may vary in rural areas. Bringing your own DVDs is recommended for use with the built-in DVD player.
23. Media
Turn on the media switch on the main switchboard to operate the media player. This activates the speakers in the back cabin and the outdoor speakers on the passenger side.
Media player button functions:
- Settings.
- Select between Bluetooth and radio options.
- Rewind.
- Forward.
- On/Off.
- Play/Pause.
- After pressing button 2, rotate button 7 to navigate available options and press to access volume settings. Rotate the knob to adjust volume. Press to select Area 1 (inside speakers), press again for Area 2 (outside speakers), or press once more to adjust both simultaneously.
- Press button 2 again to return to the main page.
24. Bed conversion
The motorhome has three double beds.
Bed 1 - Middle dinette:
- Remove the tabletop from the table leg by turning the top handle underneath the table anticlockwise 3 turns and remove.
Do not fully unwind the handle or it will remove itself from the mechanism. - Remove the table leg from its attachment point by pulling it away.
- Insert the tabletop between the two seats so it rests on the ledges to form the base of the bed.
- Arrange the seat cushions to make up the bed (Diagram A).
- Extend the bed arms using the handles to establish the double bed (Diagram B).
- Finalise the bed using the backrest from the rear dinette (Diagram C).
Bed 2 - Rear dinette:
- Remove the tabletop from the table leg by turning the top handle underneath the table anticlockwise 3 turns and remove. Do not fully unwind the handle or it will remove itself from the mechanism.
- Remove the table leg from its attachment point by pulling it away.
- Rest the tabletop on the ledges of the seating area to form part of the bed base.
- Use the backrest cushions to complete the mattress.
Bed 3 - Overhead bed:
Access the overhead bed using the ladder stored in the overhead compartment. Connect the ladder to the attachment points horizontally to ensure it is secure. The bed can then be secured with the provided net.
25. Storage
Storage cupboards are located above both the middle and rear tables. To open or close, press the silver button. Some models also feature storage units beside the rear couches with hangers for added convenience.
26. Awning
To roll out the awning:
- Find the awning winder arm in the rear storage unit.
- Place the silver knob on the end of the arm into the small insert on the left-hand side of the awning.
- Rotate the handle clockwise to open the awning. Note: ensure nobody is standing directly under the awning when opening, as legs may fall out if not locked correctly.
- Once open, remove the awning winder arm by pushing upwards and turning the silver knob to a removable position.
- Release the awning legs and twist to face the vehicle.
- Use the knob at the top of the awning leg to loosen and lengthen.
- Once lengthened, insert the silver piece into the rectangular white inserts located next to the freshwater tank and to the left of the side entrance door.
To roll up the awning:
- Remove the legs from the white inserts.
- Turn the legs clockwise and secure back into place. Ensure the leg is straight and not loose before rolling up.
- Use the awning winder arm anticlockwise until the awning has fully retracted.
27. Diesel fuel
The vehicle accepts diesel fuel only. DO NOT refill with any other fuel or fluid.
- The diesel tank cap is marked with "DIESEL" and is unlocked using the vehicle diesel key.
- The fuel filling location is next to the passenger door.
- Open the lid using your hands, then use the diesel key to unlock. Turn the key anticlockwise to unlock the cap.
- Once filled, place the fuel cap on the inlet and turn the key clockwise to lock.
IMPORTANT: The vehicle accepts diesel fuel only. If you accidentally fill the vehicle with unleaded fuel, water, or AdBlue - do not start the engine. Call JUCY Roadside Assistance immediately.
28. AdBlue
Every 2,500 km the vehicle will require AdBlue to be refilled. If the AdBlue level is low, a warning light or symbol will illuminate on the dashboard with a message to top up.
Find the nearest fuel station or auto shop supplying AdBlue and refill as soon as possible. Failure to refill the AdBlue tank will result in the vehicle going into limp mode.
Important: AdBlue is NOT a diesel fuel additive. Do not add or mix AdBlue with diesel under any circumstances.