This article is the operator's manual for the Crib+ campervan (JUCY / Star RV). It covers starting the vehicle, the 12-volt electrical system, fresh and grey water, the portable butane gas stove, tap and sink, fridge, USB chargers, bed setup, rooftop tent, storage, and refuelling.
Need-to-know
- Fuel type: Unleaded only. The fuel cap is marked "Fill me up with 91". If filled with diesel, water, or AdBlue - do not start the engine. Call JUCY Roadside Assistance.
- Daily drive time: 4–6 hours per day to keep the domestic 12-volt battery charged (powers water pump, esky, and rear interior light).
- Gas stove: Portable butane cooker. Indoor use only on the kitchen stove. Maximum 15 minutes continuous use. Not designed for pans larger than 200mm. Remove cartridge when not in use.
- Emergency contact: JUCY Roadside Assistance - call for wrong fuel or any red dash light.
1. Description of keys
Ignition key: Use the ignition key to start your vehicle.
2. Vehicle equipment
Fire extinguisher
Each vehicle is equipped with a dry chemical fire extinguisher, selected to address both Type B fires (grease and liquids) and Type C fires (electrical). A fire extinguisher is attached to the interior of the vehicle.
To deploy the extinguisher:
- Grasp the ring at the top of the bottle.
- Direct the nozzle towards the top of the flames.
- Press the lever down firmly.
- Guide the nozzle from side to side across the base of the flames.
3. Starting the vehicle
The gear stick must be in PARK and your foot on the brake pedal in order for the vehicle to start.
- The dashboard will display a 'P' indicating that the vehicle is in park.
- Start the vehicle using the ignition key.
- With your foot still on the brake pedal, pull the gear stick down into the 'D' position. The dashboard will display a 'D' indicating drive.
Handbrake: Located next to the brake pedal. Press with your foot to engage and disengage. When the brake is engaged, you will hear a continuous beeping noise.
Handbrake engaged Handbrake disengaged
4. Blinds
The vehicle is equipped with privacy curtains on the rear window, side windows, and between the front and back cab. These blinds can be rolled up when not in use.
5. 12-volt electrical system
Your vehicle has two batteries:
- Engine battery - located under the bonnet.
- Domestic battery - located in the rear of the cabin.
The domestic battery operates the cooler box and rear interior light. It is charged by the alternator when the vehicle is being driven.
Important: It is recommended that the vehicle is driven for 4–6 hours a day so the domestic battery continues to power the 12-volt system.
6. Fresh water tank
The freshwater tank is located in the rear of the vehicle, in the kitchen area.
To fill the freshwater tank:
- Flip up the compartment marked "fresh water only" - located next to the gas cooker at the rear of the vehicle.
- Place the end of the water hose into the tank and connect the hose to the tap. Turn on the tap to fill with fresh water.
Important tips:
- Do not use too much pressure - the tank must be vented while filling.
- If you get an air bubble, remove the hose, reinsert it, and fill slowly again.
- The tank is full when water starts to overflow from the water inlet.
7. Grey water
Any water that goes down your sink will come out of the left side of the rear undercarriage of the vehicle.
8. Portable gas stove
The vehicle is equipped with a portable butane gas stove, found in the kitchen compartments inside a black carry case.
- Inside the vehicle, the cooker is to be used only on the kitchen stove.
- It can be used outside on a side table.
- The cooker is designed for very short periods - no longer than 15 minutes at a time.
- This cooker is not designed for use with pans larger than 200mm.
| |
2. Open the cartridge cover. | |
3. Turn the ignition knob to OFF and set the cartridge lock lever to UNLOAD. | |
4. Slide the gas cartridge into the compartment, top end first, with its notch facing up. 5. Align the cartridge collar notch with the locator tab on the gas cooker. 6. Push and turn the knob anticlockwise past the OFF position until a click is heard. | |
Note: If the burner fails to light, immediately turn the ignition knob to the OFF position and try again.
Controlling the flame: Turn the ignition knob between HIGH and LOW.
To shut off:
- Turn the ignition knob to OFF to cut the fuel supply.
- Wait until the flame is fully extinguished.
- Raise the cartridge lever to UNLOAD.
- Remove the gas cartridge from the compartment.
Do not leave the gas bottle inside the cooker when not in use.
9. Tap and sink
This vehicle comes equipped with a water system.
To use the tap:
Push and pump the handle so the water comes out of the faucet.
10. Fridge
The fridge operates via the 12-volt system. To operate the fridge, ensure that it is plugged in and the green light on the side of the fridge is illuminated.
Important: It is recommended that the vehicle is driven for 4–6 hours a day so the domestic battery continues to power the 12-volt system.
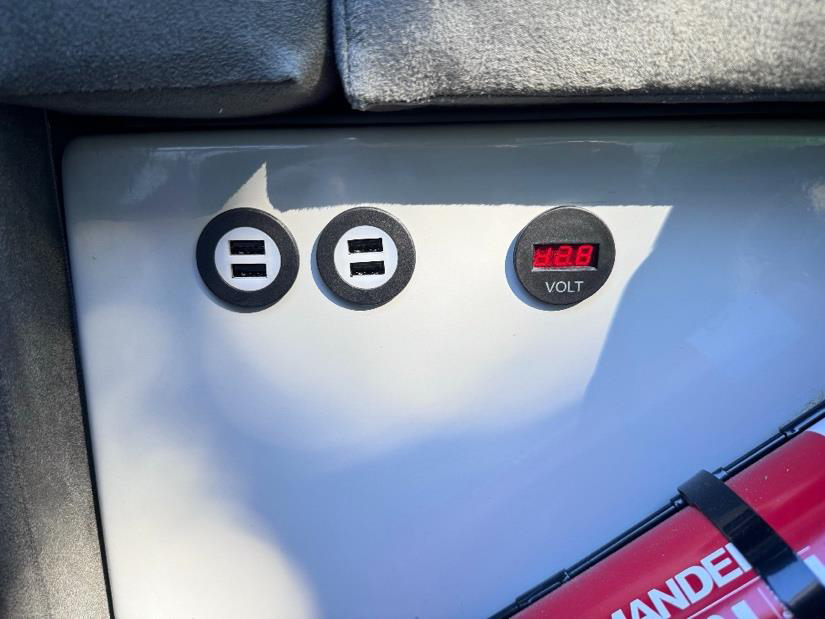
11. USB chargers
The vehicle is equipped with 4 USB power points on the side of the bed. These run off the 12-volt battery.
12. Inside table
The table components are stored under the bed. The components include a tabletop and a table leg.
To set up the table:
- Take out the tabletop and table leg from storage and insert the leg into the round area between the seats. Ensure the leg is stable and locked into place.
- Once the leg is secured, attach the tabletop to the leg. The table is now ready to use.
To disassemble the table:
- Remove the tabletop, then the leg.
- Store them back in their designated storage under the bed.
12. Bed
The vehicle is equipped with one double bed that also serves as the dining area and back seats.
To set up the bed (nighttime):
- Bring both front seats forward with the backrest pulled forward.
- Unclip the elastic and pull the bed frame towards the back seat.
- Fold down the front squab.
- Move the front seats back against the bed for additional support.
| 1. Bring both front seats forward with the backrest pulled forward. |
| 2. Unclip the elastic and pull the bed frame towards the back seat. |
| 3. Fold down the front squab. |
| 4. Move the front seats back against the bed for additional support. |
Daytime setup
The pole and tabletop are located under the bed. Place the pole into the hole on the floor and place the tabletop onto the pole.
Driving setup
14. Storage
The vehicle has a dedicated storage area under the bed to store personal items.
15. Unleaded fuel
The vehicle accepts unleaded fuel only. Do not refill with any other fuel or fluid.
- The fuel tank cap is marked with "Fill me up with 91".
- The fuel cap is located on the passenger side of the vehicle and can be opened by unscrewing the cap.
- Once filled, place the fuel cap back on the inlet and turn it to lock.
Important: This vehicle accepts unleaded fuel only. If you accidentally fill the vehicle with diesel, water, or AdBlue - do not start the engine. Call JUCY Roadside Assistance immediately.
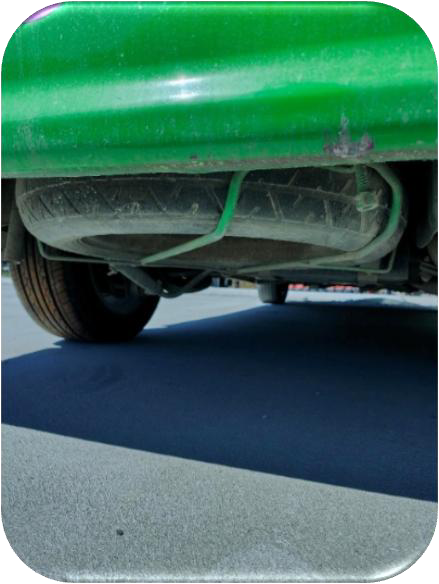
16. Jack and spare tyre
The vehicle jack is located inside the kitchen, stored on the left side behind a plastic cover.
The spare tyre is located underneath the rear of the vehicle. Ensure the jack is placed under the recommended jacking point to access the spare tyre.
Note: Check the tyre pressure and ensure it is properly inflated before continuing driving.
17. Additional information
- Tyre size: 215/60R16
- Tyre pressure: 45 PSI
- Oil type: 10W40
- Coolant type: Red coolant (any brand).
18. Dash warning lights
Warning Light Symbol | Warning light | Description | What to do |
|---|---|---|---|
| Brake warning (Red) | Handbrake engaged or low brake fluid. If shown with ABS light, brake fault. | Pull over safely and avoid sudden braking. If shown with the ABS light, stop immediately and contact Roadside Assistance. | |
| ABS warning (Amber) | ABS fault - brakes still work without ABS. If shown with brake light, possible brake failure. | If on alone, drive cautiously and check as soon as possible. If shown with brake light, stop immediately and call Roadside Assistance. | |
| Electronic Stability Control (Amber) | Traction control fault. Flashing = active; constant = fault. | Drive with caution. Restart the engine; if it stays on, contact Roadside Assistance. | |
| Electronic Brakeforce (Amber / Red) | The braking system has malfunctioned. | You can still drive very cautiously - contact Roadside Assistance. | |
| Airbag / SRS (Red) | Fault in airbag or seatbelt system. | Contact Roadside Assistance. | |
| Coolant overheat (Red) | Engine overheating - possible low coolant or leak. | Stop immediately and contact Roadside Assistance. | |
| Battery charge (Amber / Red) | Battery not charging. | Contact Roadside Assistance. | |
| Oil pressure (Red) | Low oil pressure or high oil temperature. | Stop immediately and contact Roadside Assistance. | |
| Engine management (Amber) | Fault with engine or emissions. | Continue to your destination, then contact Roadside Assistance. | |
| Oil change (Red) | Engine is due for a service and oil change. | Continue to your destination, then contact us to schedule a mechanical visit. | |
| Fuel filter warning (Amber) | Fuel filter is due for a service or there may be water in the filter. | Continue to your destination, then contact Roadside Assistance. | |
| Exhaust temperature (Amber) | Exhaust and catalytic converter temperature is too high. | Stop immediately and contact Roadside Assistance. |